Thursday, October 13, 2011

Quilty Neighborhood #5 and peek at house #6!

At long last the 5th installment of the Quilty Neighborhood series is here!
Only 2 more houses to go, and House #6 is almost ready as well!
Here is a sneak peek at the whole thing so far, WITH a little peek at house #6!
Its coming along, don't you think?

Available at your favorite Needlework shop or at my website here!

Friday, September 30, 2011

On TDIPT tonight!

 Ophelia the harvest gatherer!


And Happy Jack!
A tabletop pumpkin!

AND, during the month of OCTOBER, my pattern 
DOROTHY and TOTO is 
ON SALE 
at my website and my Etsy Shoppe!


How to paint a pumpkin head!

 When autumn comes I always feel like making a pumpkin head doll! I love to work with my favorite colors of paint, deep green and olive green, yellow ochre, burnt orange, some pretty reds!
Oh its so much fun!
So I thought I would show you how I do the underpainting on one of these dolls, to get the wonderful depth of color and tone that every vegetable girl should have!
LOL!
The idea is to under-paint highlights and low lights. The cheeks and forehead I have painted with yellow, then I have come in with deep green where the shadows might be.
Here is the face and shoulders:
The side and back of the head:
Coverage is not important. 
You will worry about coverage when you do the top coat.
Right now you are just getting in the highlights and low lights.
The same goes for the arms and legs:
Next,  you will  go over everything with a top coat. I used Terra Cotta. I am just using the 2 oz. cheap paints from the craft store.
First you block in the color, the eye whites, the color of the irises and pupils. When this is dry, sand it all over with 220 grit sand paper. This is what brings out your underpainting, and give the doll that aged patina-almost like leather!
All of the details are done with colored pencil:
Here is another one-just the head!


Thursday, September 22, 2011

Baskets and Wreaths

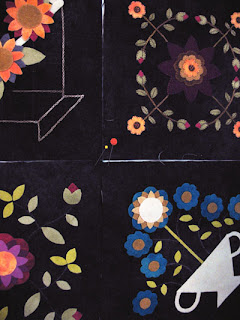
Here is a sneak peek of the project I have been obsessing about lately!
Each block will be 8" square. I think I will sash it with a batik fabric, but I'm not sure yet. I have changed the flowers so many times to get them to coordinate,
I could probably make another project just out of the rejects!
These are all wools, and once I get them all set I will begin to 
sew them down with Valdani's #12 perle cotton. The background is a lovely faded-out looking black flannel that I bought from Connecting Threads (love the lower prices there, perfect for staple fabrics like that). Click to enlarge the photo and you can get a better idea of the background fabric. This photo is a little dark, I apologize. I was playing around with the tungsten setting on my camera!

Sew what have you been doing?

xx
~Annie